TP 7: Save the robotic factory model
Overview
In the previous practical session, you modified your object-oriented model of the robotic factory so that the robots could move from one component of the factory to another. You also implemented the MVC interfaces provided by the Canvas Viewer graphical interface so that the movements of these robots could be automatically visualized.
In this practical session, you will develop the data access layer (or persistence layer) for your simulator in order to store the data of the robotic factory model on permanent storage (SSD or database). This data will then be able to be re-read when the simulator is restarted.
This persistence layer will rely on various Java classes used to handle input and output operations, such as reading and writing data to files in either text or binary format.
In this lab, you will learn to:
- Implement file-based persistence for the factory model
- Make model classes serializable and verify save/load
- Configure application logging for the simulator
Introduction to input / output in Java and data persistence
- Read the presentation on input and output in Java available here.
- Then read the presentation on data persistence here.
Update the Canvas Viewer library
- First, download the latest version of the
Canvas Viewergraphical interface, which can be found here. - Then replace your current version with this new one. You will notice differences in the canvas model interfaces, which will be explained later in this document.
The controller interface
The CanvasViewerController interface has a new method called getPersistenceManager(), as declared in the following code:
/**
* Returns the persistence manager to be used to persist this canvas
* model into a data store.
* @return A non {@code null} {@code CanvasPersistenceManager}
* implementation for the desired data storage kind
* (file, database, etc.).
*/

CanvasPersistenceManager getPersistenceManager();
This method should return an object of a class that implements the CanvasPersistenceManager interface.
Implement the persistence interface
Examine the documentation for the CanvasPersistenceManager interface. As seen in the presentation on data persistence, this interface specifies method signatures for reading, writing (persisting), and deleting a canvas model.
For this simulator, we will implement a data persistence layer that relies on the file system of the computer running the program.
- To simplify the implementation of the
CanvasPersistenceManagerinterface, create a class that extends the abstract classAbstractCanvasPersistenceManager. This class is provided by theCanvas Viewerlibrary.
The CanvasChooser interface
The AbstractCanvasPersistenceManager class contains an attribute of type CanvasChooser, and its constructor takes an object of this type as a parameter. Examine the CanvasChooser interface and its documentation. It specifies a method chooseCanvas(), which returns a string that uniquely identifies a canvas.
It is not necessary to provide a class that implements the CanvasChooser interface. Since the models will be stored in the computer's file system, you can simply instantiate the FileCanvasChooser class, which implements CanvasChooser, and is provided by the Canvas Viewer library.
The FileCanvasChooser class allows browsing the computer's file system and selecting a file whose expected extension can be specified by a constructor parameter. When a user of the Canvas Viewer graphical interface selects the menu File > Open Canvas, the FileCanvasChooser object will be used to present a list of files and folders to the user, who can then browse them to choose a model to visualize.
Model a unique identifier for the model
To store your models in the file system (which acts as a database here), each instance of your factory model should provide a string that will serve as its unique identifier in the file system. To this end, the getId() and setId() methods have been added to the Canvas interface, so that your class representing the robotic factory (Factory), which implements the Canvas interface, will need to provide an attribute for the identifier as well as accessors for this attribute.
When saving the model via the Canvas Viewer graphical interface, the FileCanvasChooser object will also be used so that the user can choose an existing file name from the file system or enter a new file name. This identifier retrieved from the FileCanvasChooser object will then be assigned to the factory model by calling the setId() method of your class. It will be composed of the file name and its path within the folder hierarchy.
Make the model classes serializable
To simplify the representation of your model in a file, you will use data serialization, as seen in the course presentation on data input and output.
- To do this, any class in your model that needs to be saved must implement the
Serializableinterface. Modify the classes in your model to implement this interface. Note that this interface is a marker interface, meaning it declares no methods and only serves to mark classes.
However, some data in the classes may not need to be preserved / saved between executions of the program. This is the case for the model's observers. It is better not to store these objects, especially since they are instances of Java graphical interface classes, which are not always serializable.
- Therefore, use the
transientkeyword to declare that the observer attribute should not be serialized. - Do not forget to modify the instantiation of the attribute to use lazy instantiation, as no class constructor will be called during the deserialisation of the object, as discussed in the presentation on input-output.
- Then, do the same for any other attributes of your model classes that should not be serialized.
Implement persistence methods
The abstract class AbstractCanvasPersistenceManager does not provide the body for the read(), persist(), and delete() methods of the CanvasPersistenceManager interface.
- You need to implement these methods in your persistence class using object serialization streams
ObjectInputStreamandObjectOutputStream, as introduced in the presentation on input and output operations. - For the
delete()method, a simple approach is to instantiate an object of thejava.io.Fileclass and call thedelete()method on this object.
Test the model persistence
- To test the persistence of your model, run the simulator as you did in the previous lab session.
- Use the
Open CanvasandSave Canvassubmenus from theFilemenu in theCanvas Viewerinterface and verify that you can save the model to disk and then correctly reload it in the graphical interface.
Set up application logging
As we saw in class, it is preferable to use a logging library to display the program’s execution traces instead of directly using the system console output. This allows storing the traces in other media, such as files.
In this part of the exercise, you will set up logging both to the console and in a log file using and configuring the JDK’s logger.
Configure the logger
As seen in class, logging can be configured in Java code or via a configuration file. For any JRE installation, a default configuration file is provided in the installation directory of the JRE. You will copy this file into a directory in your simulator project, then modify it to adjust the logger configuration to your needs.
-
As shown in the following screenshot, open the directory of your simulator project to locate the installation directory of the
JRE System Libraryin your computer's file system. From this directory, navigate to a subdirectory namedconfand copy thelogging.propertiesfile.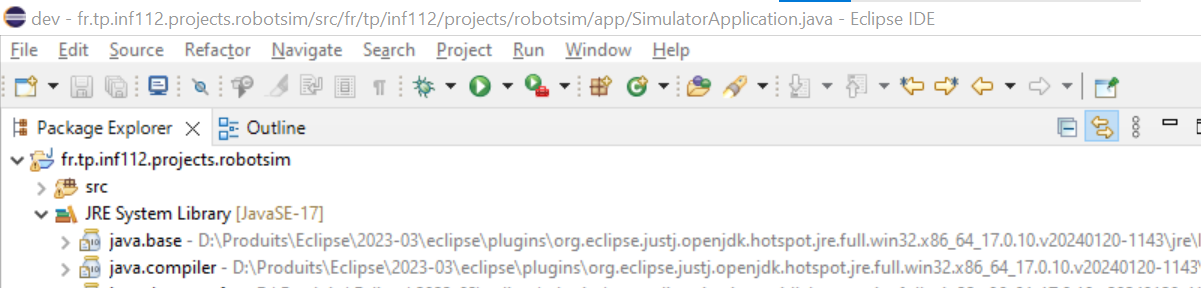
-
Create a directory named
configin your project and place the previously retrievedlogging.propertiesfile in it, as shown in the following screenshot.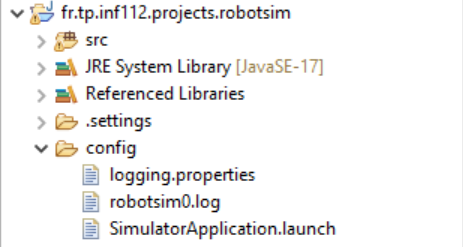
-
Open the
logging.propertiesfile in Eclipse and modify it so that two handlers are used: a first handler that writes to the console and a second one that writes to a file, as illustrated in the following screenshot.
-
Next, as shown in the screenshot below, specify the path of the log file so that it is created in the
configdirectory of the simulator project, then save the logger configuration file.
-
Then, specify the location of the logging configuration file to be used by your simulator. This can be done by setting the value of the
java.util.logging.config.fileproperty, as shown in the following screenshot.
-
Finally, also save your simulator launch configuration in your project. This will make it easier for teachers to evaluate your project, as they can directly use your launch configuration to run your simulator and check its proper functioning. This is done by selecting the
Commontab and specifying the directory in the text field of theShared fileoption, as shown in the following screenshot.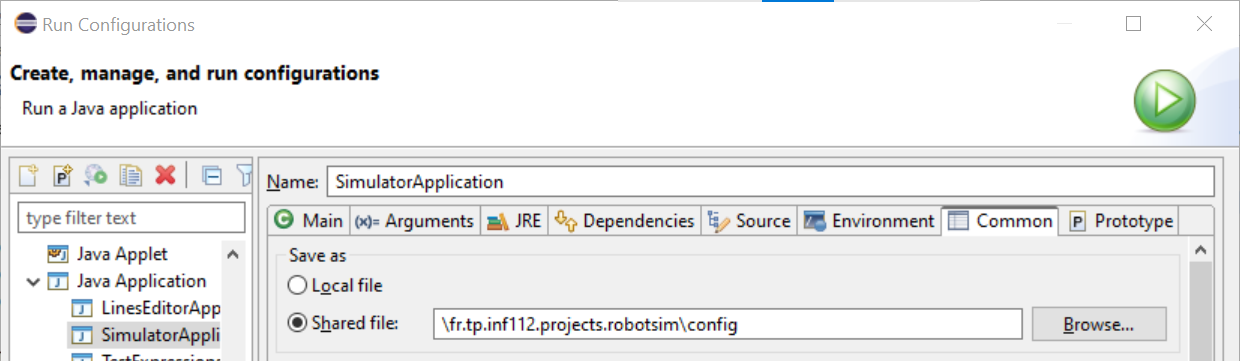
Define a logger object to display messages
-
In your simulator application's class (
SimulatorApplication), create a variable for the logger like the one in the following line.private static final Logger LOGGER = Logger.getLogger(Main.class.getName()); -
Then, display two information messages notifying the start of your simulator, with two different levels of detail:
infoandconfig, as shown in the following code.LOGGER.info("Starting the robot simulator..."); LOGGER.config("With parameters " + Arrays.toString(args) + ".");
Verify the logger's proper functioning
- Run your simulator and observe the messages that appear in the console.
- In the Eclipse project explorer, refresh the
configfolder. The log file generated by the logger should appear. - Open it and verify the messages written in it. Are all the messages properly displayed in both the console and the log file? If not, why?
- Examine the contents of the
logging.propertiesfile and change the logging level toconfig. Verify that both messages are correctly displayed in the log file. - Then, set a finer logging level (such as
fine) and restart the simulator. Do the logging messages still appear? You will notice that several messages from the graphical interface now appear at this level of detail. If the simulator's messages no longer appear, check the value of thejava.util.logging.FileHandler.limitproperty and refer to its documentation to fix the problem.
Note 1: Note that the log file is written in XML format, while the data is written in a different format in the console. How do you explain this difference?