TP 1: First "Hello World!" program
Overview
During this lab session, we will introduce the Integrated Development Environment (IDE) named Eclipse. We will learn to create and execute a simple Java program of the type "Hello World" using Eclipse. Then, we will explore how to achieve the same result using the terminal to understand how to compile and execute a Java program without relying on an IDE.
In this lab, you will learn to:
- Set up a Java project and create a class in Eclipse
- Compile and execute a Java program via the command line
- Version your code with Git and GitLab (Optional)
First contact with Eclipse
Launch Eclipse from the menus of your Linux or Windows environment.
Explorer and project
-
In the main Eclipse window that appears, locate a panel named
Package Exploreras shown below: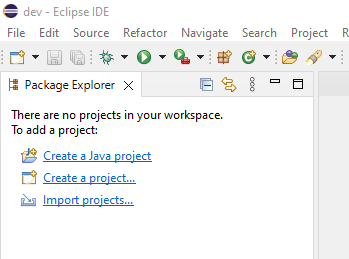
-
Inside the
Package Explorer, click onCreate a Java project. -
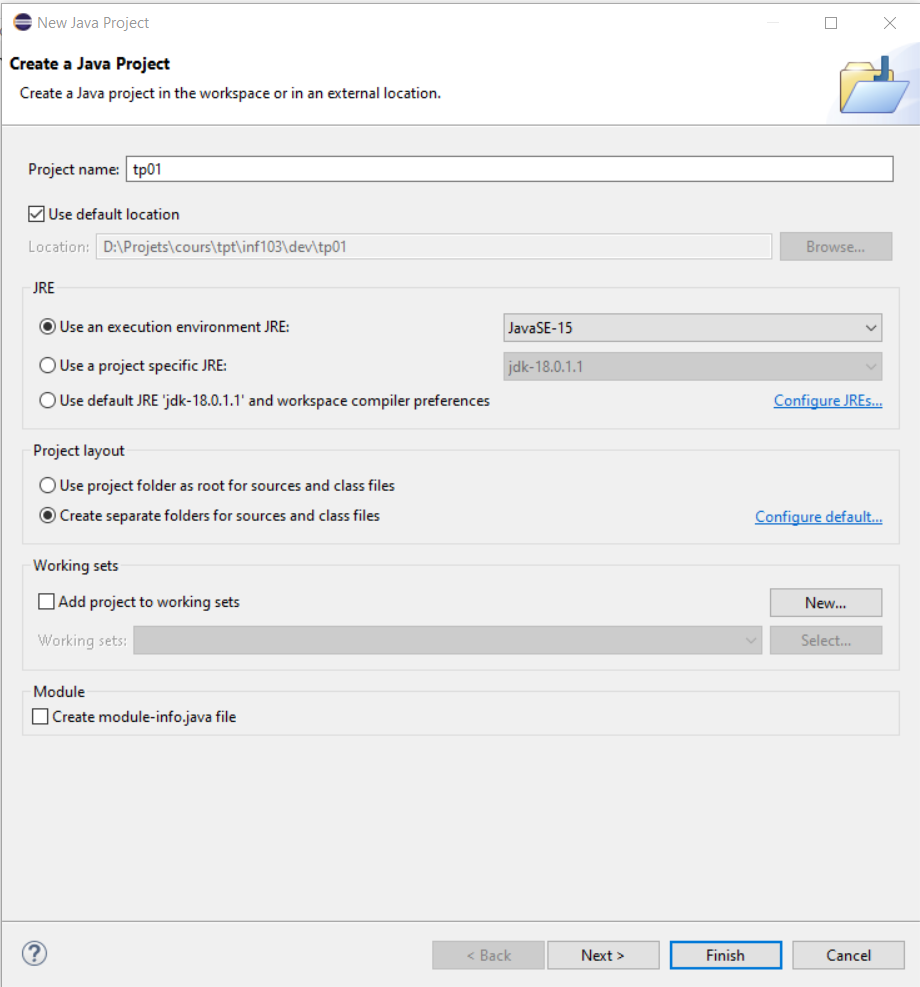
A new window appears (see below) asking you to enter the project name.
-
In the
Project namefield, entertp01. -
At the bottom of the window, locate the
Create module-info.java fileoption (see Note 1). Ensure that this option is unchecked. If it is checked, uncheck it. -
Leave all other options in the window unchanged.
-
Click the
Finishbutton.
Note 1: The concept of modules, which we will not use for this course, is designed to improve the modularity of Java applications, particularly those of very large size.
-
The created project (
tp01) appears in thePackage Explorerpanel (see below).
-
Click on the small triangle (
>) to the left of the project nametp01. The triangle turns downward (∨) and the project contents are revealed (see below).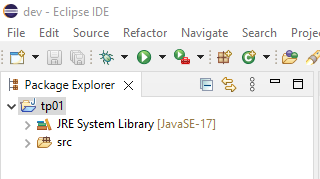
-
The
srcfolder (abbreviation for source) appears, intended to contain the Java source code of your programs, along with theJRE System Libraryfolder, which contains all the libraries that Java makes available to you. By clicking on the triangle (>) to the left of theJRE System Libraryfolder, you can see the list of these libraries (see below). -
These libraries are sets of predefined classes made available by Java. We will study some of them during the course. By clicking again on the triangle (
∨) to the left of theJRE System Libraryfolder, you can close this folder.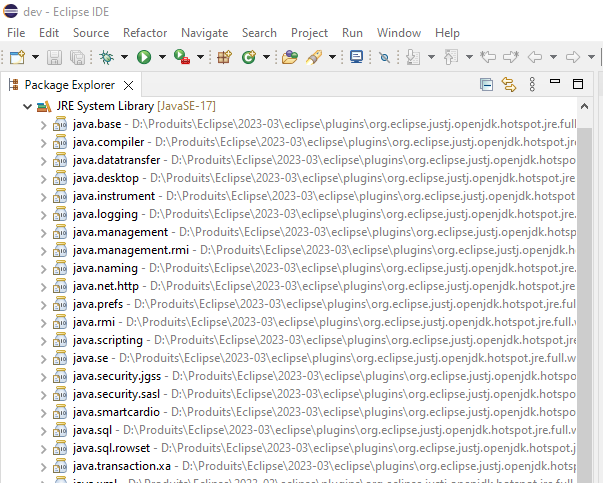
Creating a class
We are now going to create a class inside a package.
-
First, right-click on the
srcfolder. In the menu that appears, hover the mouse overNew. A submenu will appear; click onPackage. In the window that appears, entertp01as the package name and clickFinish. -
Now, right-click on the newly created
tp01package. In the menu that appears, hover the mouse overNew. A submenu will appear, hover the mouse overClassand click (see below).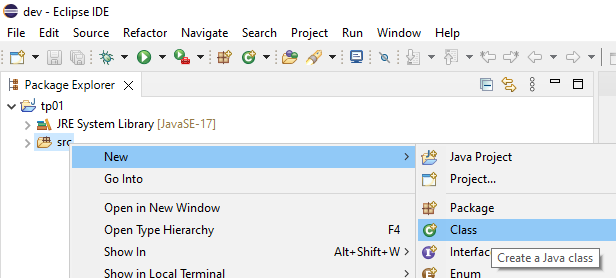
-
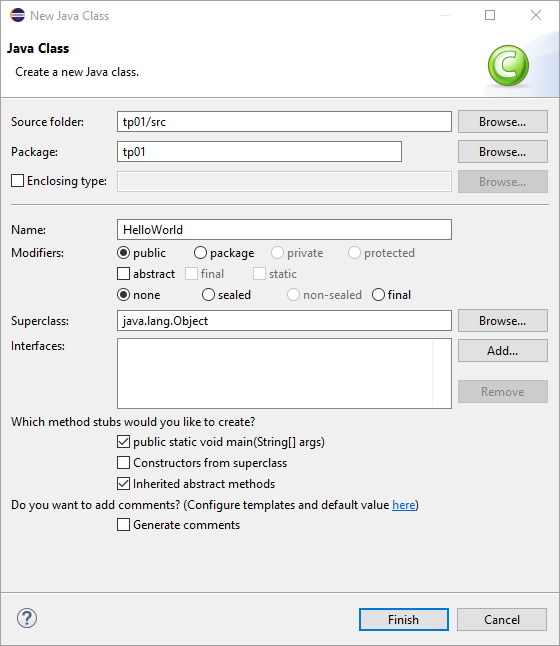
A new window like the one in the screenshot below appears.
-
In the
Namefield, writeHelloWorld, then select the checkbox shown in front ofpublic static void main(String[] args). -
Click on the
Finishbutton.
In the Package Explorer view, the class file named HelloWorld.java appears. In the central panel to the right of the Package Explorer, the Java code for this class is displayed. This panel also serves to edit the class code.
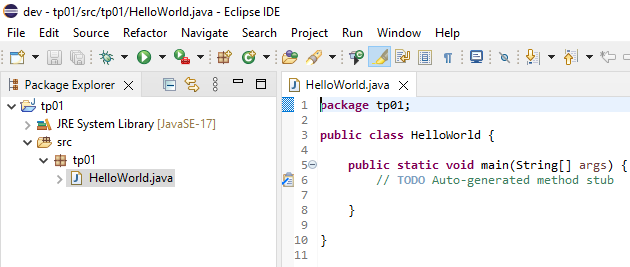
In this class, everything between the character strings /** and */ and everything between the character string // and the end of the line are areas dedicated to writing comments. These areas were generated by Eclipse. Also note the public keywords before the class and main method declarations. We will see the meaning of these keywords in a later lesson.
Remember: A method such as the
mainmethod is the one that will be executed when the program is launched.
-
This method, generated by Eclipse, is empty. In its body, write the following instruction:
System.out.println("Hello World!"); -
You should get:

-
Save the file.
By default, Eclipse will compile the class as soon as its file is saved. The function of this instruction is to write the string "Hello World!" to what is called the Console.
-
To execute this program, click on the round green button with a white triangle inside located in the menu bar (shown below).
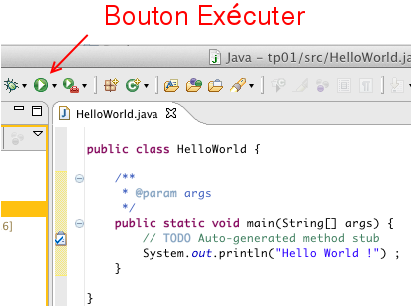
Eclipse will then execute the class, which will result in running the main method of your class, which serves as the entry point of the program. The Console panel will appear at the bottom of the code window. There, you will see the result of the print instruction. The program execution is immediately completed (shown below).
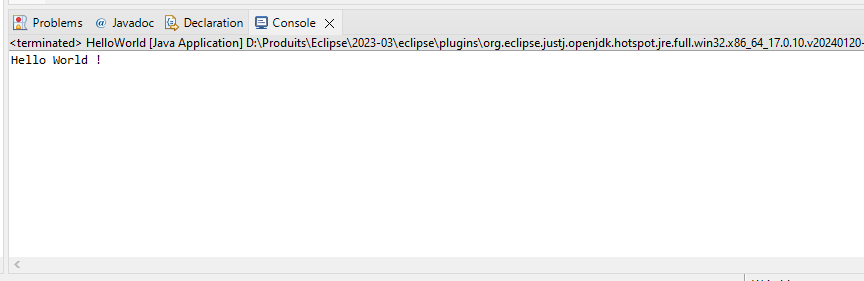
You have just executed your first program!
Compiling and executing a Java program via command line (without IDE)
As you have seen, creating a simple class and running its program is very easy with an IDE, which allows for more productive application development. But how would we do it without an IDE?
Java code is first compiled into binary code. The execution of a Java program is then done by interpreting this binary code using a JVM (Java Virtual Machine). The installation of this machine is carried out by deploying a JRE (Java Runtime Environment), which provides the virtual machine to run Java programs, or a JDK (Java Development Kit), which additionally includes the compiler (javac) and other utilities such as javadoc for automatic generation of documentation in the form of HTML pages.
These various executables are used via the terminal, a tool you have likely used before.
Compile your Hello World! program via the command line
As mentioned above, to compile and execute a Java program, you need a JDK environment specific to the given operating system (Windows, Linux, Mac). The virtual machine provided by this environment will interpret the compiled binary code to translate it into system-specific instructions. There are various providers of JDK/JRE environments, the most well-known being Oracle and the OpenJDK project.
The executables used to compile and execute Java programs are stored in a subdirectory named Java/<version_name>/bin, which is created in the operating system's program directory during the installation of the virtual machine.
-
To find out which version of Java is installed, type the following command in a terminal:
java -version -
This version corresponds to the most recent version of the Java language supported by the virtual machine. For this exercise, please ensure that the Java version is higher than 1.8.
For a given version of Java, there are two types of virtual machine installations: the JRE installation mentioned earlier and the JDK (Java Development Kit) installation. The JDK installation includes everything contained in a JRE, as well as the Java source code and the javac executable used for compilation.
Installing the virtual machine
If you are working on your own computer (and not a school computer) and receive a message stating that the javac command is not found during the following exercise, install a JDK on your computer. You can use the JDK provided by Oracle or the one from the OpenJDK project.
Note 2: Recent versions of Eclipse include their own JDK, which can also be used. If applicable, it will be located in the Eclipse installation directory under:
../eclipse/plugins/org.eclipse.justj.openjdk.hotspot.jre.full.<version>However, this may depend on how Eclipse was installed (for example, via an installer or an archive) or even on the operating system.
-
To find out the directory of the JVM used by Eclipse, simply click on the menu
Window>Preferences. In the dialog box that appears, select the branchJava/Installed JREs, as illustrated in the screenshot below. The right side of the window will indicate the installation directory of the JVM used by Eclipse.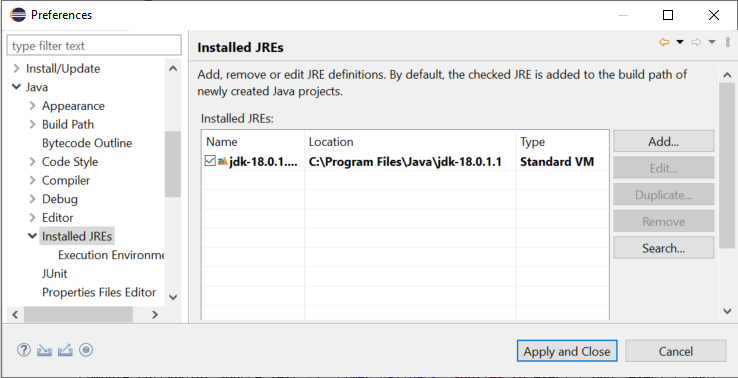
-
If you have not already done so, in a terminal, navigate to the
srcdirectory of your"Hello World!"program's Eclipse project. -
To find this directory, in Eclipse, select the
srcfolder in the package explorer, then right-click and select thePropertiesmenu. In the window that appears, select theResourcebranch. Thesrcfolder's directory is displayed on the right side of the window as indicated by theLocationlabel (Shown bellow). A button also allows you to open a file browser directly positioned in the directory.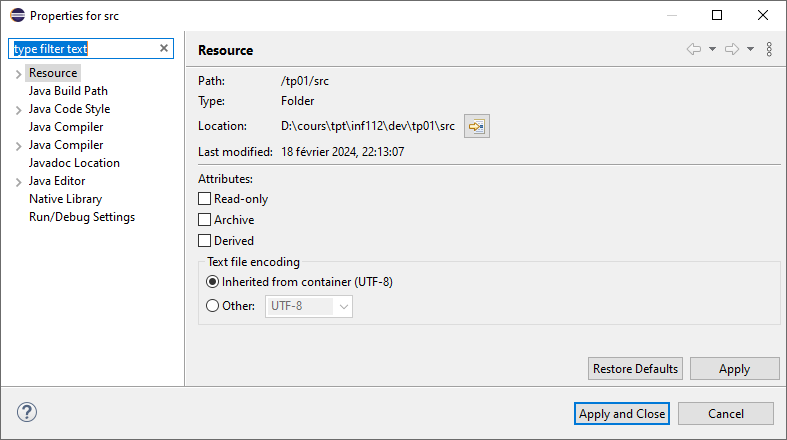
-
Then type the command
javac tp01/HelloWorld.java
Examine the contents of the src/tp01 directory containing the Java file. You will see that running the javac program has produced another file named HelloWorld.class from the HelloWorld.java file. This file contains the binary code generated by compiling the Java code.
It is possible to specify a directory (different from src) to javac for storing compiled files. For example, during compilation, Eclipse will store the compiled files in a different directory named bin (for binary) located at the same level as src in the project directory.
Execute your "Hello World!" program
The HelloWorld.class file containing the compiled code can now be executed by the virtual machine.
-
To do this, run the java executable with the class name as a parameter. While still being in the
srcdirectory, type the command:java tp01/HelloWorld -
You should see the following string displayed in the terminal.
Hello World! -
It is also possible to perform these two operations ( that is, Nr. 6 and 7) in a single command with the Java executable. First, delete the compiled
HelloWorld.classfile and verify that it has been deleted. Then, type the command (see also Note 3):java tp01/HelloWorld.java -
You will see the string
Hello World!displayed in the terminal.Hello World!
Note 3: Executing the program in this way, note that the compiled file was not saved to disk. It was simply created and then executed without being saved. Thus, it is preferable to first compile a program using
javac(which is what Eclipse does), as the program can then be executed as many times as desired without recompiling.
Note 4: These commands work for a class contained in a
package1 namedtp01(that is, its.javafile is directly in thetp01subdirectory ofsrc). If you have declared your class in another package (for example, a package namedtest), its.javafile will be contained in a subdirectory namedtestofsrc. To execute this class, you must position yourself in thesrcdirectory and prefix the class name with its package nametestinstead oftp01.If you try to execute the class in the
testsubdirectory, you will see an error message such as
Error: Could not find or load main class HelloWorld
You must therefore verify that you are launching the commands from the
srcdirectory.
These simple commands show us how Eclipse (or any other IDE) compiles and executes a Java program for us. In Eclipse, compilation is executed each time a Java file is saved. Thus, when a project contains multiple Java files, Eclipse will only recompile the modified files and those that depend on them, which is called incremental compilation, minimizing the compilation time.
We will cover the concept of packages in a later course.
Committing your project to GitLab (Optional)
Note: This step is optional for this lab but highly recommended, as you will need to use Git throughout the course and for your final project.
Now that you have created your first Java project, it is important to learn how to version your code using Git and store it in a remote repository on GitLab. This will allow you to track changes, collaborate with others, and back up your work.
Creating a GitLab repository
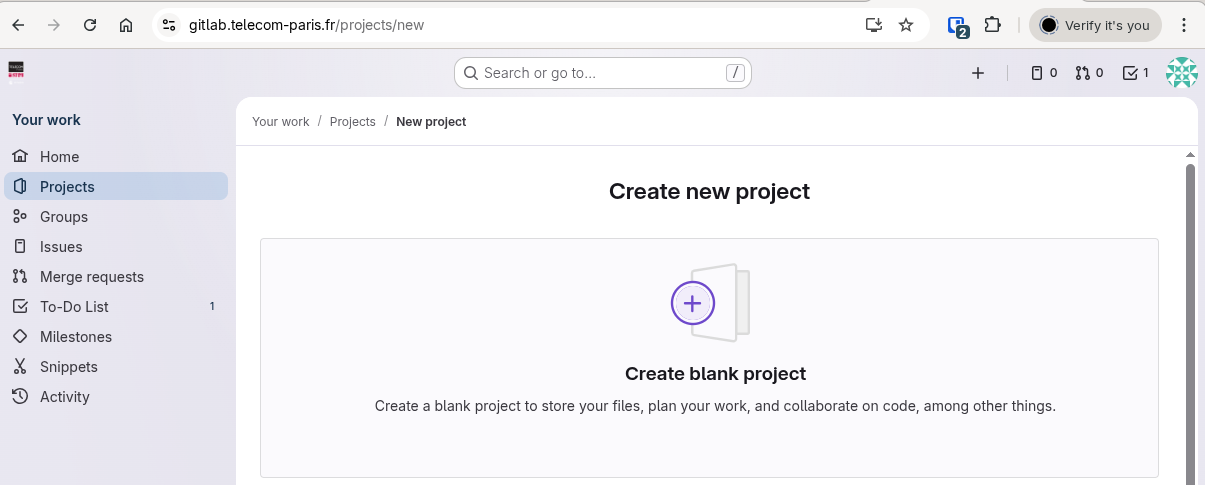
- Go to GitLab and log in with your school credentials.
- Click on
New project(or the+button in the top menu).
- Select
Create blank project.
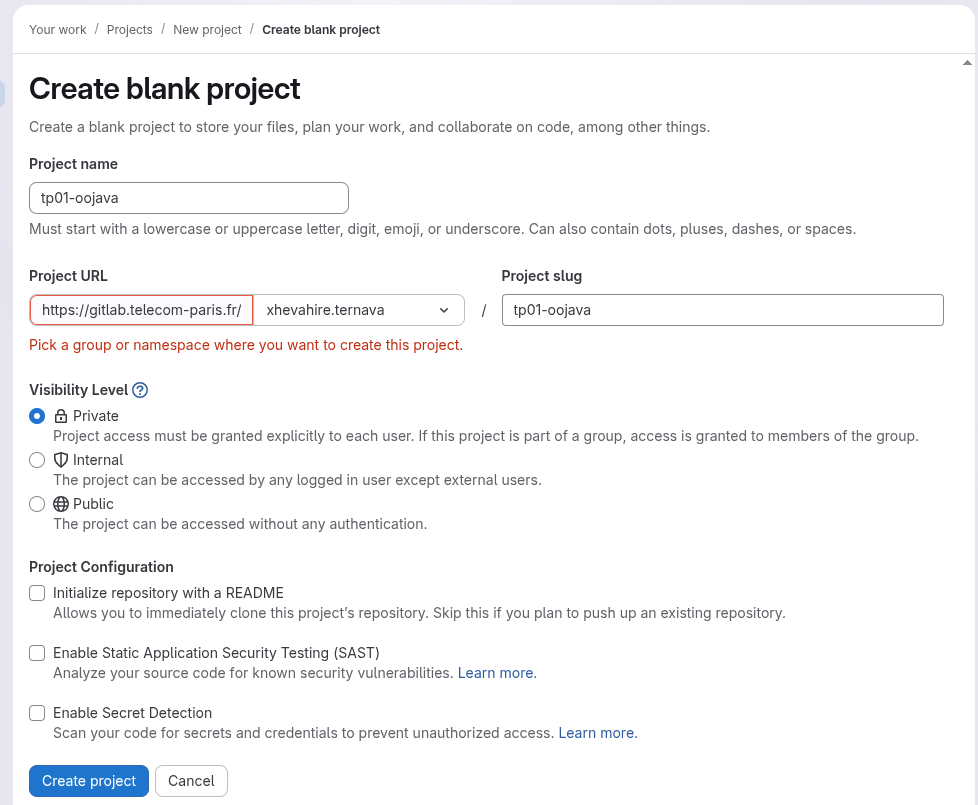
- In the
Project namefield, enter your project name following the format:tp01-oojava. - Set the visibility level to
Private. - Uncheck
Initialize repository with a README(we will initialize it locally). - Click
Create project.
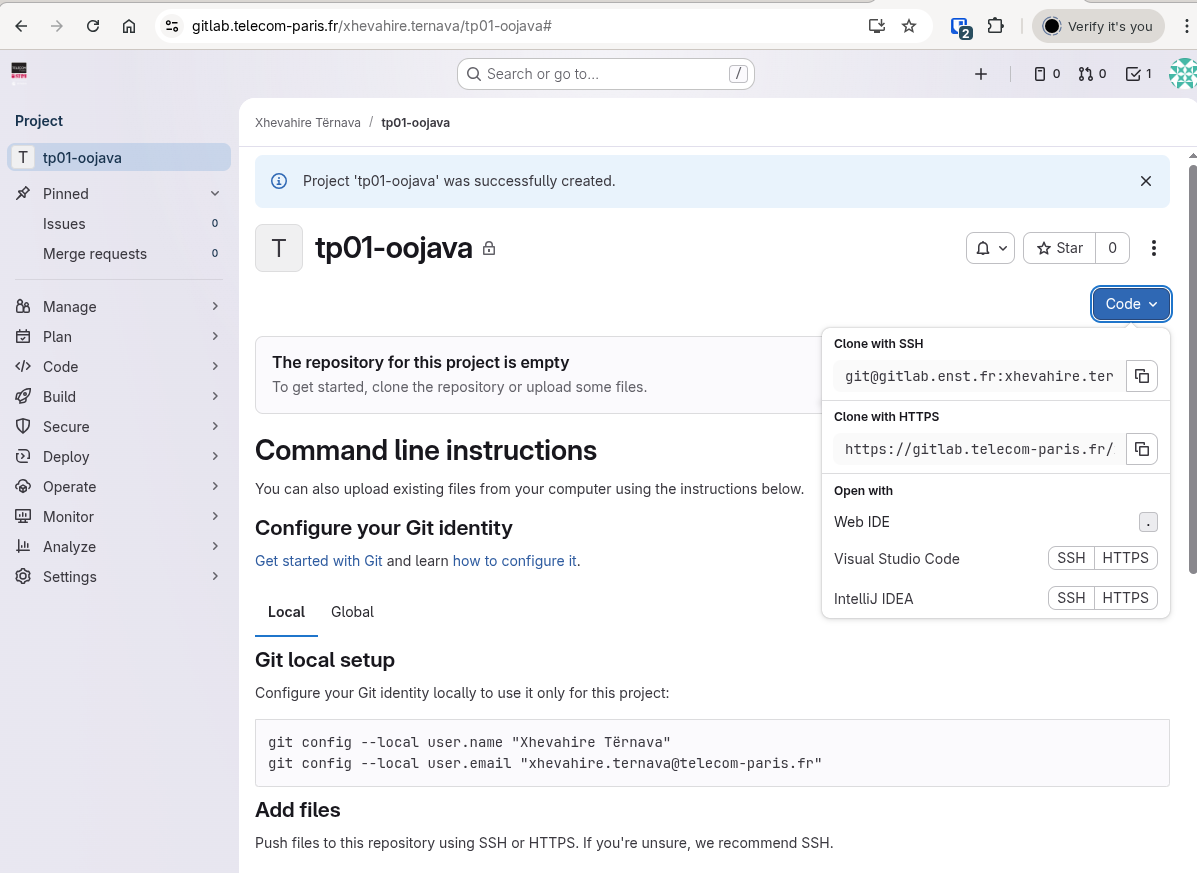
- GitLab will display a page with instructions. Keep this page open as you will need the repository URL.
Initializing Git in your project
-
Open a terminal and navigate to your Eclipse project directory (the parent of the
srcfolder). -
Initialize a Git repository:
git init -
Configure your Git identity (if not already done):
git config user.name "Your Name" git config user.email "your.email@telecom-paris.fr" -
Create a
.gitignorefile to exclude compiled files:echo "bin/" > .gitignore echo "*.class" >> .gitignore
Committing and pushing your code
-
Add all files to the staging area:
git add . -
Create your first commit:
git commit -m "Initial commit: Hello World program" -
Add the remote GitLab repository (replace
<your-repository-url>with the URL from step 8):git remote add origin <your-repository-url>If you accidentally pushed to the wrong repository:Run the following in your git terminal to change the remote to the correct repository URL:
git remote remove origin git remote add origin <your-new-repository-url> -
Push your code to GitLab:
git push -u origin mainNote: If your default branch is named
masterinstead ofmain, use:git push -u origin master -
Refresh your GitLab project page in the browser. You should now see your project files in the repository.
You have successfully versioned and pushed your first Java project to GitLab!