TP 2: Programming a Robot class
Overview
In this assignment, we will learn to code a first class used to model a robot, which will ultimately serve to model the production factory in the simulator you must produce as part of this course’s project.
Because programming software is more familiar with English than other languages, it can be complicated to work with class, method, or attribute names written in French. This is why you will always use English words in your code.
The internet is a reference for Java programming. You will find programming examples for everything you want. Just use a search engine with the right keywords. You will also find tutorials on using Eclipse, the vast majority of which are in English. If your version of Eclipse is in French, it may require some effort to find your way around.
In this lab, you will learn to:
- Create a class with attributes and a constructor
- Customize object display with the
toString()method - Use IDE code generation features
Getting started with the robotsim project
-
Launch Eclipse from your operating system's menus.
-
Using the
File>New>Java Projectmenu, create a project namedrobotsim.
Note 1: The sources for this project should be archived in a Git repository that will be provided to you and will constitute your development project to be submitted at the end of the course.
Creating a Robot class
-
In the
srcfolder of therobotsimproject, as done for theHelloWorldclass in the previous assignment, create a class namedRobot. This class will be used to model the concept of a robot within a washer production factory, similar to the one you will develop for the course project. -
Among the attributes of the
Robotclass, we must have:-
An attribute named
nameof typeString. -
An attribute named
speedof typedouble.
Use the Java code editor to declare these attributes in the
Robotclass. -
-
We will now write a constructor for this class. This constructor should initialize all fields. You can code this constructor directly in the class editor or use the IDE:
(a) Right-click in the editing window of the
Robotclass or on theRobot.javafile in thePackage Explorer.(b) A menu appears; move the mouse over
Source.(c) A second menu appears; click on
Generate Constructor using Fields(do not selectGenerate Constructor from Superclass; this concept has not yet been covered in the course).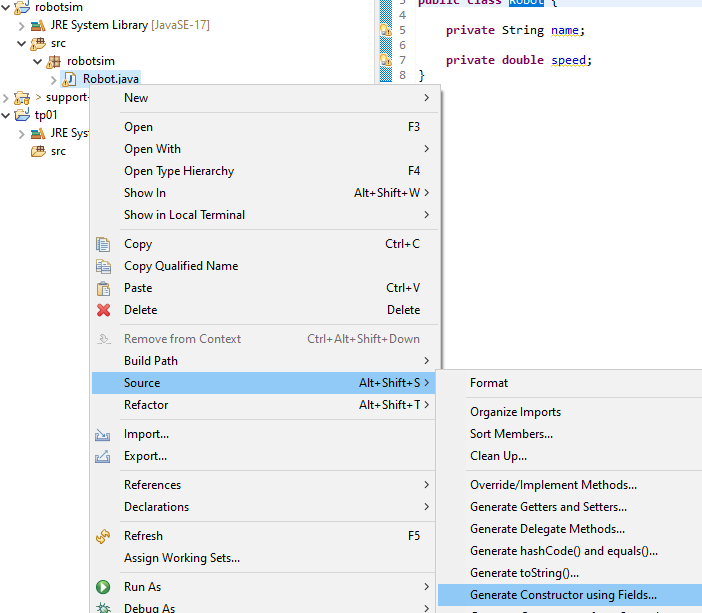
-
A window appears that allows you to customize the constructor:
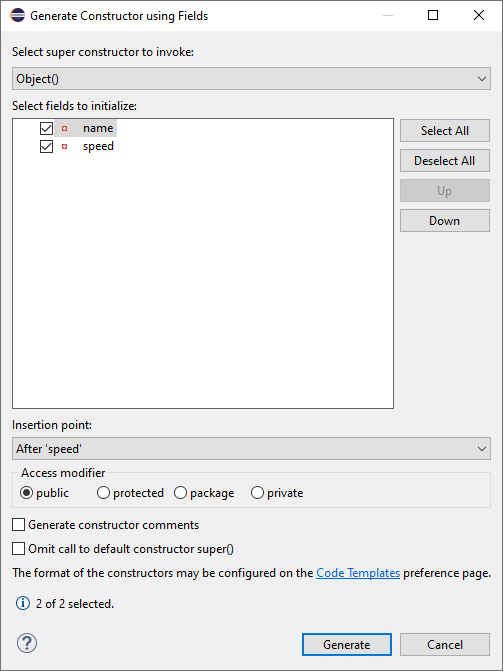
-
Verify that both attributes are selected. The
Insertion pointof the constructor in the class can be left as is or selected to be, for example, after the declaration of the attributes. -
Click on the
Generatebutton. You then get a modified class: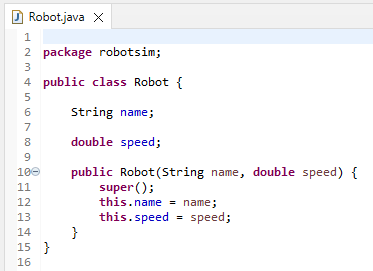
-
Before leaving a class to edit another, always save the class currently being edited. The
Savebutton is located in the menu bar of Eclipse.
Creating a TestRobotSim class
-
Now, let's generate a second class called
TestRobotSimcontaining amainmethod, like in theHelloWorldclass from the first lab (TP01). -
In this
mainmethod, create anobjectof typeRobotwith the instruction:Robot myRobot = new Robot("Robot 1", 5); -
Then print the
objectin the console with the instruction:System.out.println(myRobot); -
Then run the program. What do you notice about the output of the class?
Customizing object display with toString
We can see that Java does not know how to display an object of the class. It knows how to display strings, numbers, etc., but it does not know the class, which is our invention. When Java does not know how to display an object, it displays the name of the object's class, here Robot, followed by the $@$ symbol (at sign), followed by the memory address of the object expressed in hexadecimal (base 16).
If we want Java to be able to display an object of the class correctly, we need to provide a toString() method returning a string representation to display / print the object. This method has the following header:
public String toString();
To generate this method in the Robot class, you can use the IDE:
-
Right-click on the editing window of the
Robotclass. -
A menu appears. Move the mouse over
Source. -
A second menu appears; click on
Generate toString(). A window appears to offer you the generation of atoString()method: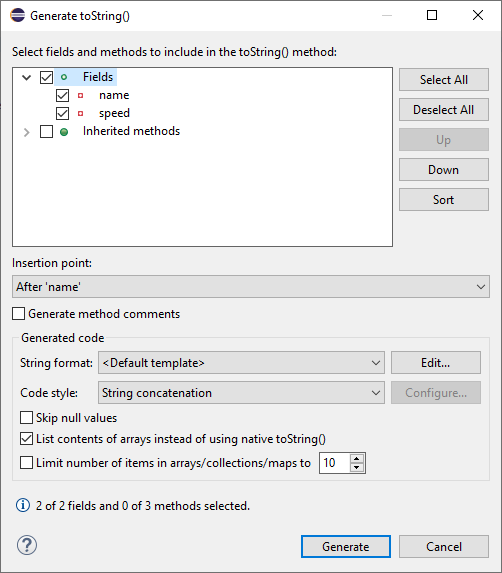
-
The method that will be generated will calculate a string that includes the name of the class followed by the value of the attributes. In this window, it is possible to add other properties to the display. Click on the
Generatebutton. -
The class is modified:
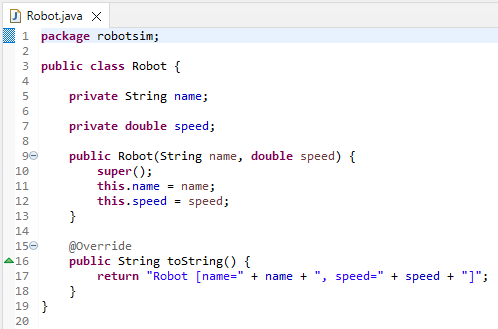
The
@Overrideannotation, placed just before the method, indicates that this method is overriding an inherited method. We will cover this in the course later. -
Run the program again. Is the object's display more understandable and useful now? You should get this in the
Consoleview:
Redefining the display of robots
Now let's improve the default toString() output with a more human-readable format.
-
Execute your program from the previous lab (TP01) to verify that everything still works well.
-
Modify the
toString()method of theRobotclass so that it returns the string formed as follows:My name is Robot 1 and I move at 5.0 km/h. -
Run your program and verify that everything works correctly.
Utility of an IDE
In this lab, you wrote little code manually. This will not always be the case. The development environment allows us to perform standard coding tasks (generation of constructors, getters, setters, toString(), etc.) with just a few mouse clicks.
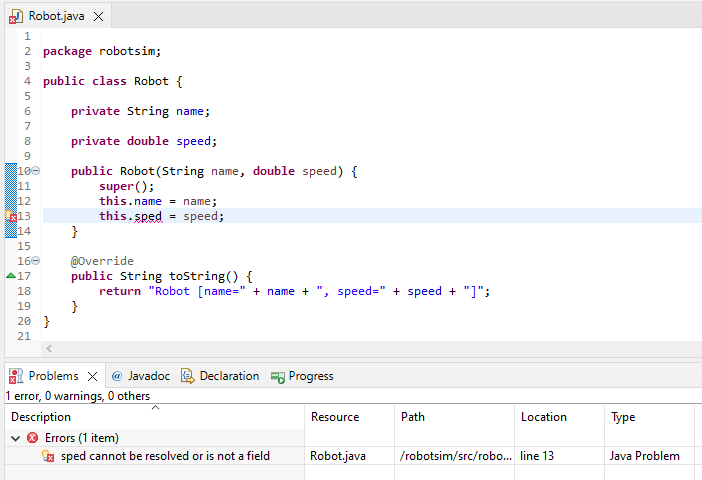
The IDE also notifies you of compilation errors and warnings via the Problems view shown in the following screenshot. In this view, double-clicking on an error in the list will take you directly to the position of the error in the Java code editor.
Moreover, in the margin of the code editor, error correction suggestions can be proposed by the IDE by clicking on the light bulb, as illustrated by the screenshot of the following window. In this example, the speed attribute name was incorrect.
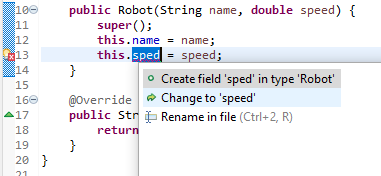
It is also possible to automatically rename code elements such as class or variable names (refactoring).
All these features are very useful in an industrial development environment as they greatly improve the programmer’s productivity. You should not hesitate to use them, although you should always understand the generated code. Indeed, the IDE will not program algorithms for you, although extensions such as Copilot (a paid tool) using artificial intelligence could potentially be useful.