TP 3: Modelling a factory containing robots
Overview
For this lab, you will continue working in the same project as the previous lab, TP02 (named robotsim), which will eventually contain all the sources for your development project in this course.
Remember: This project will be submitted at the end of the course.
In this lab, you will learn to:
- Encapsulate class data and generate accessors
- Create a Factory and manage robots with collections
- Organize classes into packages and use imports/constructors
To model a goods production factory, you will add a new class named Factory.
- But first, launch Eclipse to work on the same
robotsimproject.
Encapsulating the Robot class data
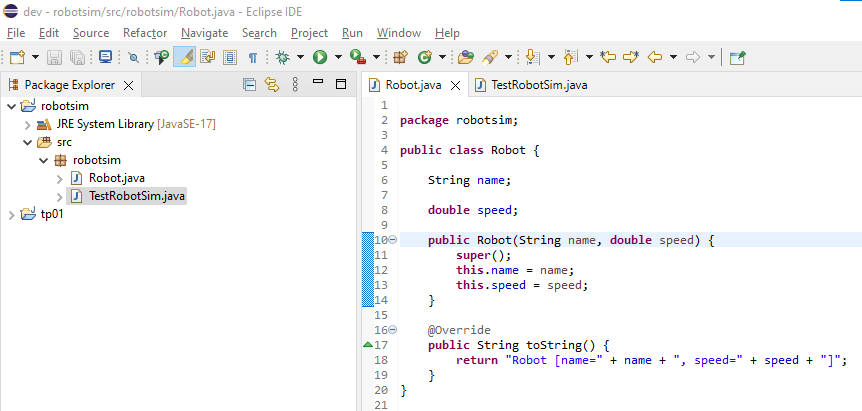
We have seen in class the importance of encapsulating data. This is done using the private visibility keyword in Java. Modify the visibility of the attributes in your Robot class, then generate accessors for these attributes, considering that a robot's name cannot change during its existence, which is not the case for its speed. Just like for the generation of the toString() method in the previous lab, the IDE can automatically generate these accessors for you.
Creating a Factory class
-
By right-clicking on the
robotsimpackage and then selecting theNew>Classmenu, create a class namedFactory. -
Since a factory has a name and must contain multiple robots, declare in this class a
nameattribute as for yourRobotclass and an attribute namedrobotsof typeArrayList<Robot>to contain the factory's robots. Don't forget to encapsulate these attributes using theprivatequalifier. You should get this:
Import declaration
A red mark indicating an error has appeared in the left margin of the code editor. When hovering over this marker with the mouse, the error is displayed:

-
Indeed, the
ArrayListclass is not known by default. As seen in class, you must import this class using the declaration:import java.util.ArrayList;This declaration must be placed at the beginning of the class file. Here again, the IDE can help you. By clicking on the red error mark, the IDE will offer you different possible solutions:
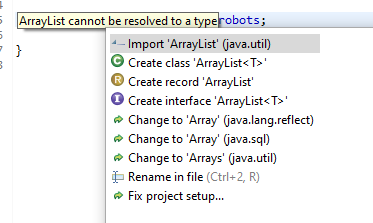
The first solution is of course the correct one. Move the mouse and click on
Import 'ArrayList' (java.util). The import declaration is then automatically added to the class.
Writing the constructor
As we have seen in class, by default the robots attribute is initialized with the value null. We need to specify a constructor to initialize the attributes of a class with suitable values. Consult the Javadoc of the ArrayList class to know the constructors of this class.
The constructor must create and assign the ArrayList for robots, and take the name as an argument.
-
Write a constructor for your
Factoryclass.Hint: Your constructor should look like this:
public Factory(String name) {
    this.name = name;
    this.robots = new ArrayList<Robot>();
}
Adding a robot to the factory
-
Write a method in the
Factoryclass that will allow adding robots to the factory. It will have the following signature:public boolean addRobot(String name)This method should first verify that the name of the new robot named
nameis unique among the names of robots that have already been added to the production factory. If thenameis unique, then the method should create a newRobotobject with the given name and a speed of0.0, add it to the factory's list of robots, and return the boolean valuetrue. Otherwise, the robot will not be added to the factory and the boolean valuefalsewill be returned.
Verifying the uniqueness of robot names
-
Write a method in the
Factoryclass that will verify the uniqueness of a robot name passed as a parameter. This method, which will be called by theaddRobot()method, will have the signature:private boolean checkRobotName(String name)It should iterate through the list of robots to verify that none of them has the same name as the one passed as a parameter. The method should return
trueif the name is unique (i.e., no existing robot has it), andfalseotherwise.
Displaying the factory and its robots to the console
-
Write a method in the Factory class with the following signature:
public void printToConsole()This method will display the name of the factory as well as the list of its robots to the
Console.
Testing the methods
-
In the
main()method of theTestRobotSimclass created in the previous lab, add instructions that will:-
Create an object of the
Factoryclass. -
Add a few robots to this object. Make different trials with some robots with identical names to verify that your program works correctly.
-
Display the
Factoryclass object to theConsole.
-
-
Execute your program with different sets of robots and verify that what is displayed on the
Consoleis correct.
Organizing classes into packages
You have probably noticed when you created the Robot and Factory classes with Eclipse that it put them in a package named robotsim, which has the same name as the project.

This organization of classes is not ideal because, as seen in class, it is preferable to group classes that perform a common functionality of the application within the same package.
The Factory and Robot classes perform the function of modelling the production factory. They will therefore be grouped within a package named fr.tp.inf112.robotsim.model. What about the TestRobotSim class?
To change the package of a class, it is not enough to rename the package declaration in the class. Indeed, Java requires that the class file be located in a directory tree of the file system equivalent to the class package name, after converting the "." characters of the package name to "/" characters.
Again, the IDE can automatically change the package declaration of the class and move its file to the correct corresponding subdirectory.
-
To do this, select the class(es) in the package explorer and right-click. In the menu that appears, select
Refactor>Move...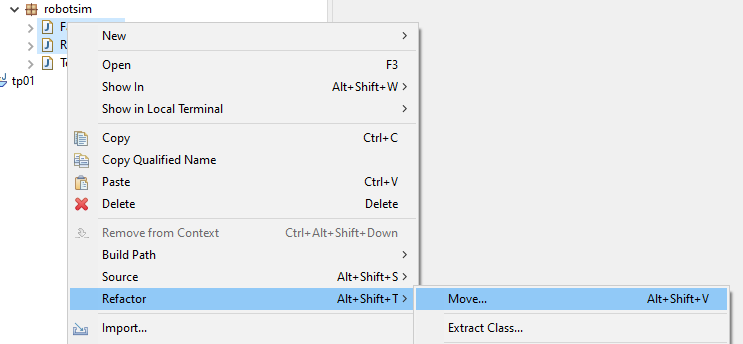
-
In the dialogue box that appears, enter the desired package name and click
Finish.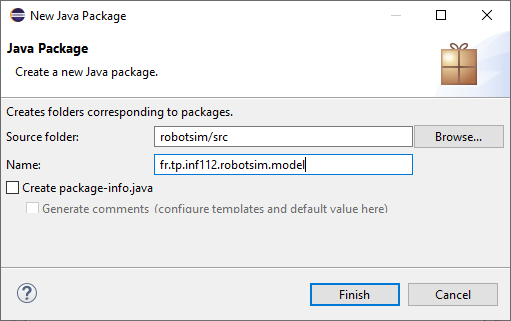
Do not forget to also change the package of the
TestRobotSimclass. Since it is not part of the model, move it to a separate package, for examplefr.tp.inf112.robotsim.app. -
Run the
TestRobotSimclass again to verify that your program still works correctly after reorganizing your classes.